Wednesday, November 21, 2018

SharePoint - Sync User Provide to Site Collection

SharePoint - Sync User Provide to Site Collection

Sometimes the sync between the User Profile service and the site collections get disconnected and updates to the site collection do not get synced.

Running theses stsadmn commands and the timer job usually fix the problem. The first commend is not necessary but reports the current state.

Stsadm.exe –o sync –listolddatabases 0
Stsadm.exe –o sync –deleteolddatabases 0
Ruun Timer Job "User Profile Service Application - User Profile to SharePoint Full Synchronization" from CA .

SQL - List of accounts and database permissions

SQL - List of accounts and database permissions


DECLARE @DBuser_sql VARCHAR(4000)
DECLARE @DBuser_table TABLE (DBName VARCHAR(200), UserName VARCHAR(250), LoginType VARCHAR(500), AssociatedRole VARCHAR(200))
SET @DBuser_sql='SELECT ''?'' AS DBName,a.name AS Name,a.type_desc AS LoginType,USER_NAME(b.role_principal_id) AS AssociatedRole FROM ?.sys.database_principals a
LEFT OUTER JOIN ?.sys.database_role_members b ON a.principal_id=b.member_principal_id
WHERE a.sid NOT IN (0x01,0x00) AND a.sid IS NOT NULL AND a.type NOT IN (''C'') AND a.is_fixed_role <> 1 AND a.name NOT LIKE ''##%'' AND ''?'' NOT IN (''master'',''msdb'',''model'',''tempdb'') ORDER BY Name'
INSERT @DBuser_table
EXEC sp_MSforeachdb @command1=@dbuser_sql
SELECT * FROM @DBuser_table ORDER BY DB
Name


From <https://social.msdn.microsoft.com/Forums/sqlserver/en-US/2044d912-72b2-4859-af58-d089284a7120/query-to-see-all-databases-to-which-a-user-has-access?forum=sqlsecurity

SQL - List Linked Servers and Logins

SQL - List Linked Servers and Logins

Probably need sysadmin role for this. Copied from the internet, need to find refernce.

SELECT    ss.name 
          ,ss.product 
          ,ss.provider 
          ,'Local Login ' = case sl.uses_self_credential 
                            when 1 then 'Uses Self Credentials' 
                            else ssp.name 
                            end 
           ,'Remote Login Name' = sl.remote_name 
           ,ss.modify_date 
      FROM sys.Servers ss 
 LEFT JOIN sys.linked_logins sl 
        ON ss.server_id = sl.server_id 
 LEFT JOIN sys.server_principals ssp 
        ON ssp.principal_id = sl.local_principal_id

SQL - List databases, size, and file location

SQL - List databases, size, and file location

This is based on something I found on the internet 7 years ago. Reference unkown

SELECT
    D.name,
    
    F.Name AS FileType,
F.type_desc,
    F.physical_name AS PhysicalFile,
    F.state_desc AS OnlineStatus,
    CAST((F.size*8)/1024 AS VARCHAR(26)) + ' MB' AS FileSize,
    CAST(F.size*8 AS VARCHAR(32)) + ' Bytes' as SizeInBytes
FROM 
    sys.master_files F
    INNER JOIN sys.databases D ON D.database_id = F.database_id
ORDER BY
    D.name

SQL - List Databases


SQL - List Databases

Probably need sysadmin server role to see all databases?

select * from sys.databases

Monday, November 19, 2018

Photo Retouching Service Review - Portrait vs Still Life

The photo retouching market has exploded with online service offerings. Many of them are focused on the portrait market and fewer offer services for still life.

If you offer photo retouching services, provide your link below in the comments. 

Thursday, November 15, 2018


Based on - https://prajwaldesai.com/install-configuration-manager-clients-using-client-push/

1.1      Client Push Account

The account that you add must have the permissions to install the client software, in other words the user account should have the local admin rights in the machine.
1.     Launch the configuration manager console
2.     click on Administration, under Site Configuration,
3.     click on Sites, in the Sites list, select the site for which you want to configure automatic site-wide client push installation.
4.     On the top ribbon click on Client Installation Settings and click on Client Push Installation.
5.     On the Client Push Installation Properties windows
6.     Click on Accounts tab, we need to add an user account with which the client installation happens. Click on yellow color icon and click on New Account.

How To Install Configuration Manager Clients By Using Client Push Snap3
7.     added a user account named Woodbourne\sccmadmin which is a member of domain admins group.
How To Install Configuration Manager Clients By Using Client Push Snap4


How to delete an application in sccm

From: https://prajwaldesai.com/how-to-delete-an-application-in-sccm-2012/
How to delete an application in sccm 2012. The question is why do you want to delete the application that’s deployed to collections. The reason for deletion of application may be the users won’t require it anymore or another software might be replaced with it which has good features than the existing ones or it any be any other reason.. Well, if you try to right click the application and click delete, the application will not get deleted in SCCM 2012. There is a small procedure that you need to follow in order to delete the application. Lets take a look at it.

How To Delete An Application In SCCM 2012

Launch the ConfigMgr Console, Click on Software LibraryApplication Management
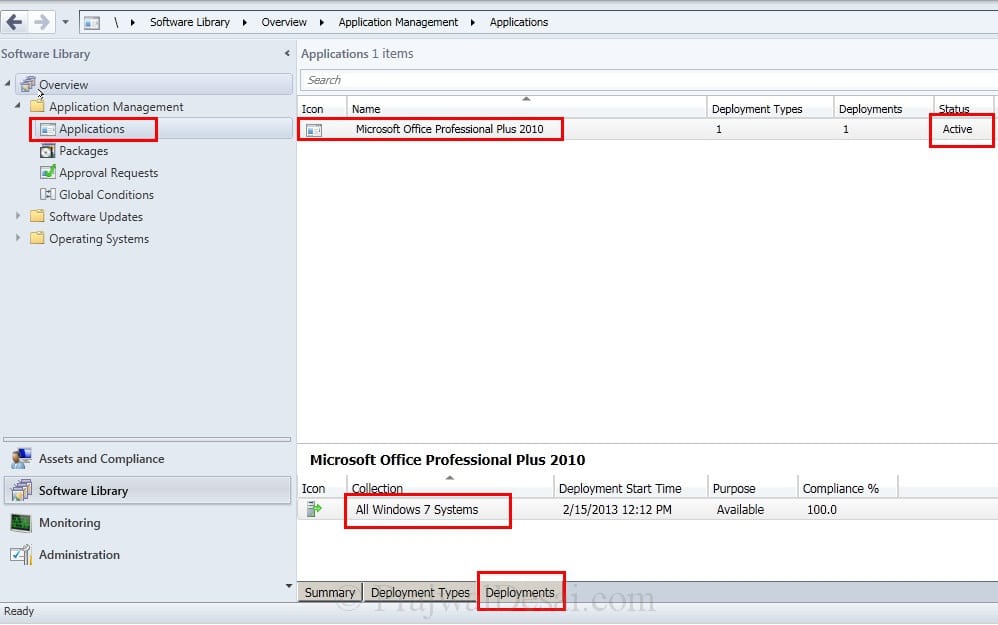
Applications. In the previous post we had deployed Office 2010 using sccm to a collection. In this post we will be deleting this application from our sccm server.
How To Delete An Application In SCCM 2012 Snap 1
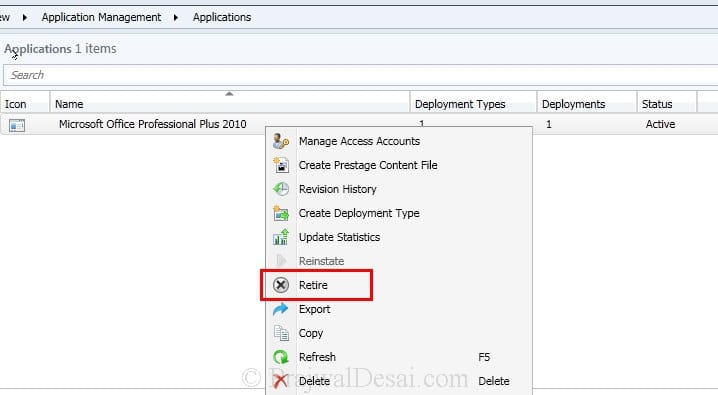
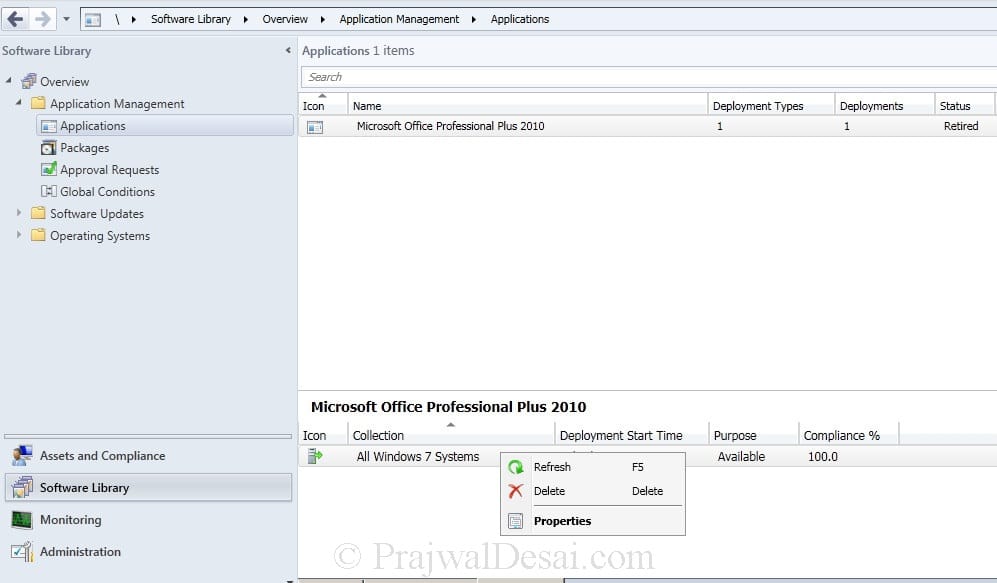
When we right click the application and select Delete, we get a warning message box. It clearly shows that the number of active deployments is 1 which means the application is deployed once. Click OK.
How To Delete An Application In SCCM 2012 Snap 2
Before we delete the application its recommended to retire that application. To do so right click the application and click Retire.
How To Delete An Application In SCCM 2012 Snap 3
Next we click on Deployments and we see that the application is deployed to a collection named All Windows 7 Systems. Right click the Collection and click Delete.
How To Delete An Application In SCCM 2012 Snap 4
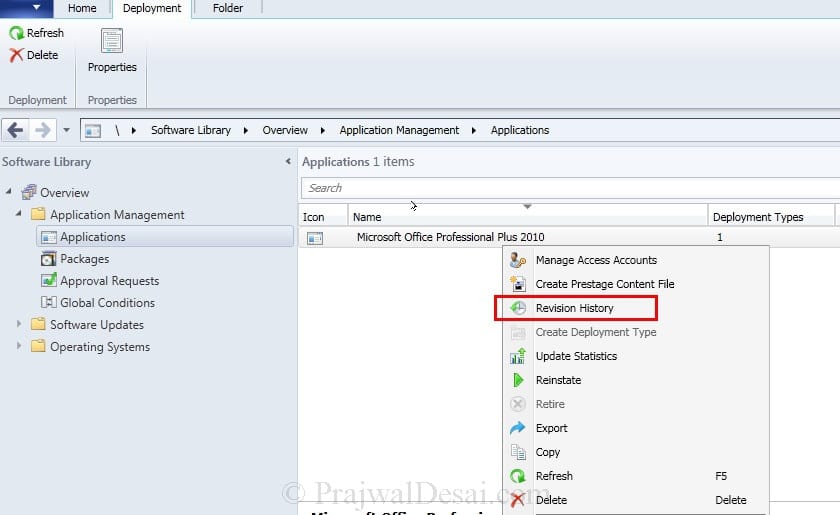
Right click the Application and click Revision History.
How To Delete An Application In SCCM 2012 Snap 5
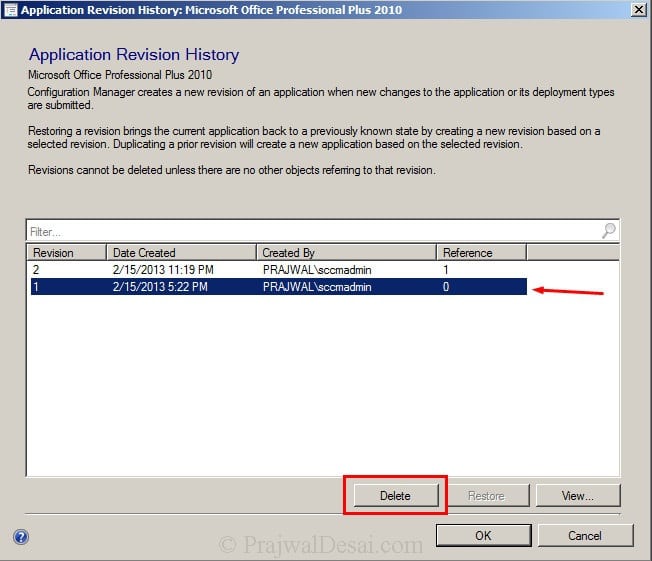
On the Application Revision History window, start deleting the revisions from the bottom.
How To Delete An Application In SCCM 2012 Snap 6
Delete all the revisions one by one.
How To Delete An Application In SCCM 2012 Snap 7
Once you have deleted all the revisions, right the application and delete it. You get a warning box, click Yes to delete the app permanently.
How To Delete An Application In SCCM 2012 Snap 8

Wednesday, November 14, 2018

SQL - List Active Connections


SELECT
    spid,
    sp.[status],
    loginame [Login],
    hostname, 
    blocked BlkBy,
    sd.name DBName, 
    cmd Command,
    cpu CPUTime,
    memusage Memory,
    physical_io DiskIO,
    lastwaittype LastWaitType,
    [program_name] ProgramName,
    last_batch LastBatch,
    login_time LoginTime,
    'kill ' + CAST(spid as varchar(10)) as 'Kill Command'
FROM master.dbo.sysprocesses sp 
JOIN master.dbo.sysdatabases sd ON sp.dbid = sd.dbid
WHERE sd.name NOT IN ('master', 'model', 'msdb') 
--AND sd.name = 'db_name' 
--AND hostname like 'hostname1%' 
--AND loginame like 'username1%'
ORDER BY spid

PowerShell - Restart WSUS

    Stop-Service IISADMIN
    Stop-Service WsusService   
    Start-Service IISADMIN
    Start-Service WsusService

PowerShell - SCCM Set Max Execution Time on Software Update Group

#Load Configuration Manager PowerShell Module
Import-module ($Env:SMS_ADMIN_UI_PATH.Substring(0,$Env:SMS_ADMIN_UI_PATH.Length-5) + '\ConfigurationManager.psd1')

#Get SiteCode and set Powershell Drive
$SiteCode = Get-PSDrive -PSProvider CMSITE

Set-location $SiteCode":"

$start = Get-Date
$cmsugs = Get-CMSoftwareUpdate -UpdateGroupName "Server-2018" -Fast | Select CI_ID, LocalizedDisplayName, MaxExecutionTime, LocalizedCategoryInstanceNames # | ft -AutoSize
$count = 0
Foreach ($SoftwareUpdate in $cmsugs){
    if($SoftwareUpdate.MaxExecutionTime -ne 10800)    {
    $count += 1
        #$SoftwareUpdate
        Set-CMSoftwareUpdate -Id $SoftwareUpdate.CI_ID -MaximumExecutionMins 180
    }
}
$finish = Get-Date
$seconds = ($finish - $start).TotalSeconds 
$report =  "count: "+ $count + " " + $start + ", " + $finish + ", " + $seconds + " " + "Ave: " + $seconds/$count
write-host  $report